VR / MR Video Capturing
If you want to take movies of you working in VR, you can use MARUI’s VR Capturing functionality.
Supported file types are PNG, TGA, and JPG image sequences.
By using the FFmpeg library, you can also record MP4 movie files.
Capturing to an MP4 video file with FFmpeg
In order to record your VR view as a movie file instead of an image sequence, you need the open source FFmpeg library.
Please download the following shared-library files of FFMpeg-4.4.4 and place them in the same directory as your MARUI plug-in (.MLL) file:
avcodec-58.dll
avformat-58.dll
avutil-56.dll
swresample-3.dll
swscale-5.dll
VR Capturing from the Users’ Point of View
Start MARUI normally. As soon as MARUI is running, a new item will appear on your Maya shelf in the MARUI tab that will allow you to open the VR Capturing dialog.
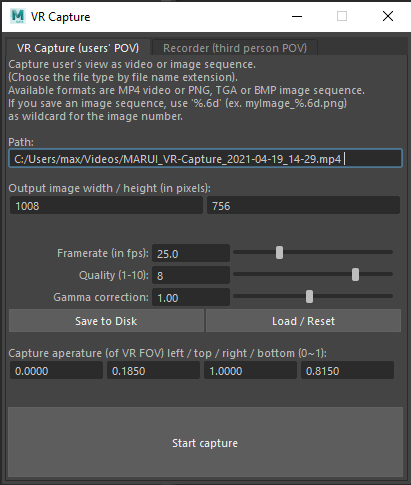
The file type will be automatically selected based on the file name that you choose.
Available file types (file name extensions) are: “png”, “tga”, “jpg”, and “bmp”. When you have the FFmpeg libraries placed next to your plug-in file, you can also choose “mp4” video format.
If you record your video as an image sequence, include a C-style (printf-style) format string to be adjusted to the image number in the sequence.
Simply insert “%.6d” at the place where you want the image sequence number to appear.
You can chose the resolution and recording frame rate in the fields below the file name.
The quality setting only affects video files.
Finally, you can also specify the aperture of your field of view in VR.
Zero here means “left” or “top” of the image respectively, and one is the right edge or bottom of the image.
This is helpful because the horizontal and vertical field of view in VR is different from common video aspect ratios such as 4:3 or 16:9.
The default values in width, height, and aperture are chosen to create an optimally sized video with 4:3 aspect ratio by cutting off the top and bottom of your field of view in VR.
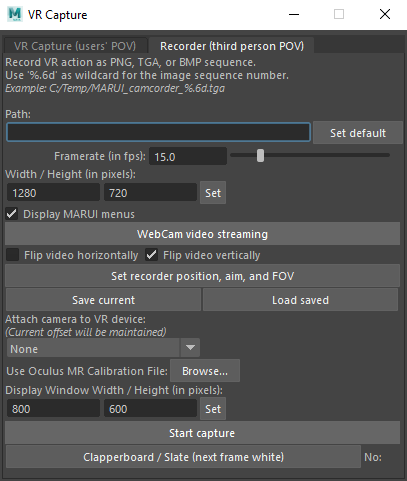
Capturing VR / MR Video from a Third-Person Point of View (“The Recorder”)
In the “Recorder” tab of the VR Capturing Dialog, you can choose to record your scene from a different point of view, such as when observed by a third person.
For a detailed discussion on how to use the Recorder, please see the following video and documentation article:
https://www.youtube.com/watch?v=WxhksRMKf_I
Setting recording details
The Recorder menu allows setting image width, height, and filename / file type,
along with the desired focal length (fx, fy) and centroid (cx, cy).
Focal length and centroid (the camera intrinsics) are specified relative to the defined image width and height.
Therefore, a centroid of cx=0.5, cy=0.5 is in the center of the image,
and a focal length of fx=1.0 means that the cameras focal length is the same as the width of its sensor (film back).
”Example:
So let’s say your camera has 2/3″ sensor (8.8mm x 6.6mm) and you record it with 15mm focal length, then fx would be 15mm / 8.8mm = 1.7 and fy = 15mm / 6.6mm = 2.27.”
In order to make mixed reality videos, you should use camera calibration software like MRPT, which will require you to take a series of pictures of a chessboard pattern and then calculate the focal length and centroid.
The output may look like this:
”resolution=1920 1080
cx=970.40973
cy=512.52167
fx=1845.70793
fy=1861.81341”
The numbers here are all in pixels, meaning the focal length is about 1845 pixels. It is also different horizontally (x) and vertically (y).
So for MARUI the resulting values are (approximately):
”cx=970 / 1920 = 0.50
cy=512 / 1080 = 0.47
fx=1845 / 1920 = 0.96
fy=1861 / 1080 = 1.72”
Setting the recorder position
You can use either the HMD or one of the controllers to set the Recorder to the position of the camera in reality.
Note that for MARUI the controller coordinate system lies a bit in front of the handle, hovering above the circular opening.
Once the position is set, use the “aim” button to define the direction in which the camera should face.
When you click the button, the camera will be rotated such that it looks at the current position of the controller or HMD respectively.
Starting and stopping the recording
When you click on the start button, a Recorder window will open showing you what is being recorded.
In some cases (when Maya is too busy) the window will not open immediately. In this case, you can use the button in the Recorder menu to force it to open.
As long as the window is open, the Recorder will write images to the disc.
If the CPU or disc IO bandwidth are insufficient, frames will be dropped to ensure the framerate stays constant. You can later wither ignore the missing frame sequence numbers or fill the gaps by interpolating between the adjacent frames.
To stop recording, just close the Recorder window.
Troubleshooting:
Maya prints out errors “Writer thread unresponsive – killing it.”
This happens when system performance is insufficient to record at the desired framerate and indicates that a frame was lost because it could not be written fast enough. Please try choosing a lower framerate if the problem persists.
The framerate is not exactly the desired framerate
This is a known issue. MARUI can lag behind frame recording when system performance is insufficient.
If you are troubled by this, please contact support to press for a quick fix.