How to use MiVRy.cs in Bolt FlowGraphs
(1) Make sure both Bolt and MiVRy are installed in your project.
Open the Mivry.cs file in the Assets/GestureRecognition/ folder and un-comment the following line by removing the “//” at the beginning of the line.
//#define MIVRY_USE_BOLT
to
#define MIVRY_USE_BOLT
(2) In Unity, open the Bolt Unit Options Wizard (in the title bar menu Tools -> Bolt -> Unit Options Wizard, if the menu does not exist, check if Bolt was installed properly in your project).
In the Wizard, click “Next” to get to the “Type Options” page.
At the bottom of the list, click the “+” icon twice to add two more entries.
For the two entries select “Mivry” (C# script) and “Gesture Completion Data” (object).
Then, click “Generate“.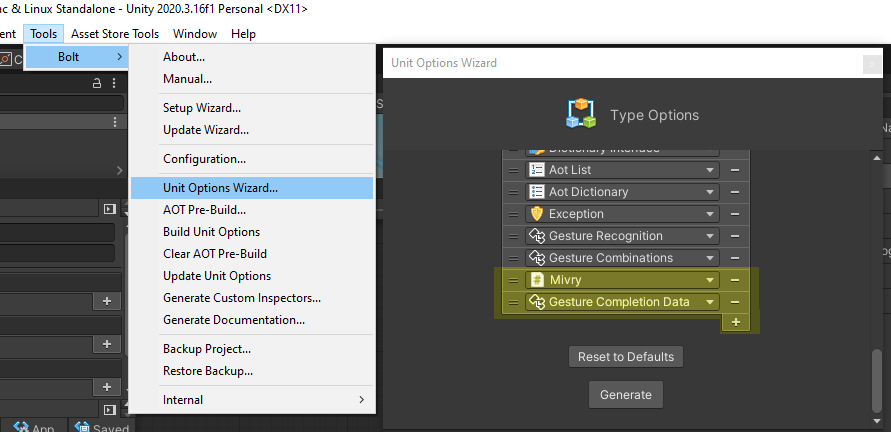
(3) Add the “Mivry” script component to any game object in your scene. (For example, you can right-click in the Hierachry and select “Create Empty”, select the new object, and in the Inspector click on “Add Component” and choose “Mivry”.
In the inspector, fill in the values of the Mivry script components, especially “Gesture Database File”, “Left Hand”, “Left Hand Trigger Input”, “Right Hand” and “Right Hand Trigger Input.
Alternatively, you could also create a scene variable or graph variable, but then you have to set the member variables (such as “Gesture Database File”) in a Flow Graph instead of just using the Inspector.
(4) Open your Bolt flow machine / flow graph. (If you do not yet have a flow graph, you can create one on the same game object by clicking “Add Component” in the Inspector and selecting “Flow Machine”. On the new component click “Edit Graph”).
(5) In the Variables “Blackboard” switch to the “Scene” tab and create a new variable by typing in a Name in the “(New Variable Name)” field and pressing the “+” icon.
If you cannot see the Blackboard, you can open it from the title bar menu “Window” -> “Variables”.
As “Variable Type” select “Mivry”, and as “Value” select the object to which you attached the Mivry script component in step (3).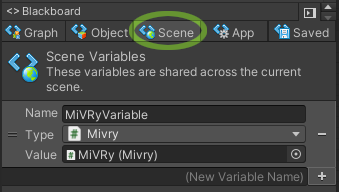
(7) In the Flow Graph, add a “Get Scene Variable” node (by right-clicking in the graph and selecting “Get Scene Variable”), and set it to the Mivry Variable created in step (6).
Then create a “Custom Event” node (right-click in the graph and select “Custom Event”), and connect the Get Variable node as it’s input object.
Change the number of “Arguments” to “1”,
and change the Event String to the name of your gesture.
This event will now be triggered when the user performed the gesture. You can use this event to trigger further changes in your own code.
Optionally, you can expose the argument “Arg. 0” as “Gesture Completion Data”, for example to check the similarity of the gesture performance. (When you expose the object, be sure to select “Instance” and not “Static”).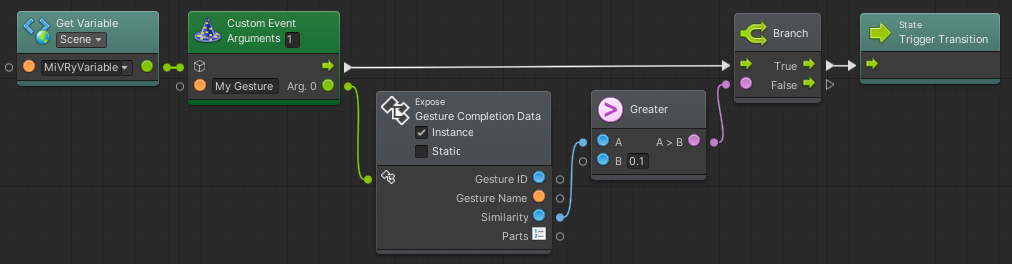
How to use MiVRy.cs in Bolt StateGraphs
(1) Make sure both Bolt and MiVRy are installed in your project.
Open the Mivry.cs file in the Assets/GestureRecognition/ folder and un-comment the following line by removing the “//” at the beginning of the line.
//#define MIVRY_USE_BOLT
to
#define MIVRY_USE_BOLT
(2) In Unity, open the Bolt Unit Options Wizard (in the title bar menu Tools -> Bolt -> Unit Options Wizard, if the menu does not exist, check if Bolt was installed properly in your project).
In the Wizard, click “Next” to get to the “Type Options” page.
At the bottom of the list, click the “+” icon twice to add two more entries.
For the two entries select “Mivry” (C# script) and “Gesture Completion Data” (object).
Then, click “Generate“.
(3) Add the “Mivry” script component to any game object in your scene. (For example, you can right-click in the Hierachry and select “Create Empty”, select the new object, and in the Inspector click on “Add Component” and choose “Mivry”.
In the inspector, fill in the values of the Mivry script components, especially “Gesture Database File”, “Left Hand”, “Left Hand Trigger Input”, “Right Hand” and “Right Hand Trigger Input.
Alternatively, you could also create a scene variable or graph variable, but then you have to set the member variables (such as “Gesture Database File”) in a Flow Graph instead of just using the Inspector.
(4) Open your Bolt state machine / state graph. (If you do not yet have a state graph, you can create one on the same game object by clicking “Add Component” in the Inspector and selecting “State Machine”. On the new state machine component click “Edit Graph”).
(5) Make sure there are at least two states, of which one must be the “Start” state, and the states are connected by a transition.
If you do not have any states yet, right-click in the graph window, and select “New Flow State”. You can toggle one of the states to be the start state by right-clicking it and selecting “Toggle Start”. You can create a transition between two states by right-clicking the first state, and selecting “make transition”, and then clicking on the second state.
Then double-click on the transition to open the transition graph.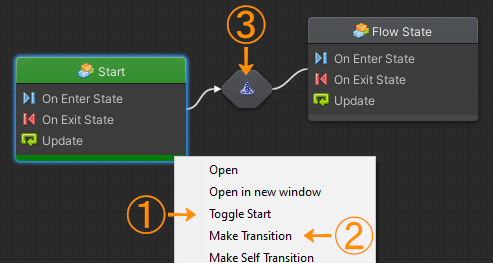
(6) In the Variables “Blackboard” switch to the “Scene” tab and create a new variable by typing in a Name in the “(New Variable Name)” field and pressing the “+” icon.
If you cannot see the Blackboard, you can open it from the title bar menu “Window” -> “Variables”.
As “Variable Type” select “Mivry”, and as “Value” select the object to which you attached the Mivry script component in step (3).
(7) In the Transition Flow Graph, add a “Get Scene Variable” node (by right-clicking in the graph and selecting “Get Scene Variable”), and set it to the Mivry Variable created in step (6).
Then create a “Custom Event” node (right-click in the graph and select “Custom Event”), and connect the Get Variable node as it’s input object.
Change the number of “Arguments” to “1”,
and change the Event String to the name of the gesture that you want to trigger the transition.
Optionally, you can expose the argument “Arg. 0” as “Gesture Completion Data”, for example to check the similarity of the gesture performance before triggering the transition. (When you expose the object, be sure to select “Instance” and not “Static”).