MiVRy Unity Documentation

Quick Start Guide

This guide explains the simplest way to use MiVRy in your Unity project. Necessarily, a lot of features are not fully explained here. Please read the rest of this document for more details and additional explanations of features.

2.1: Use the Gesture Manager to record your gestures:

Either open the GestureManager scene in the GestureManager/ folder in Unity or download a pre-built version of the GestureManager from:
https://www.marui-plugin.com/download/mivry/MiVRy_GestureManager_Win.zip
A video tutorial on how to use the GestureManager is available on YouTube:
https://www.youtube.com/watch?v=xyqeacqpES8
When you are happy with your recorded gestures, save the recorded gestures to a Gesture Database File (.dat file).

2.2: Import the plug-in library files and script files into your project:

To use MiVRy in your own project, you need to import the plug-in library files (.dll and/or .so files) as well as the script files (Mivry.cs, GestureRecognition.cs, and GestureCombinations.cs).
You can do so either by importing the MiVRy Unity package or by manually copying the files.

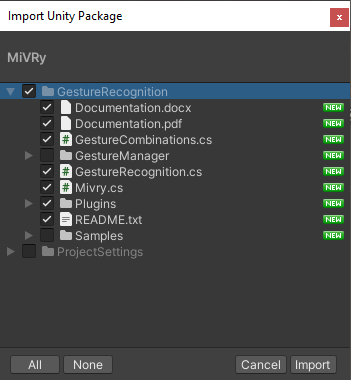
2.2.A: Importing the MiVRy Unity Package:
You can get the MiVRy Unity Package either on the Unity Asset Store ( https://assetstore.unity.com/packages/add-ons/mivry-3d-gesture-recognition-143176 ) or from Github ( https://github.com/MARUI-PlugIn/MiVRy/blob/master/unity/MiVRy.unitypackage ).
When you get the MiVRy package through the asset store, you can add it to your project via the Unity Package Manager (in the title bar “Window” -> “Package Manager”).
If you download the package from Github, import it by selecting “Assets” -> “Import Package” -> “Custom Package” on the title bar.
The package also contains the source code to the GestureManager and several samples.
These are not required and are optional.
To use MiVRy, you only need to select the “Plugins/” folder and the Mivry.cs, GestureRecognition.cs, and GestureCombinations.cs script files.
Unity Package Manager

Unity Package Import

2.2.B: Manually import the library files and script files:
Alternatively, to importing the package, you can manually copy the required files into your project.
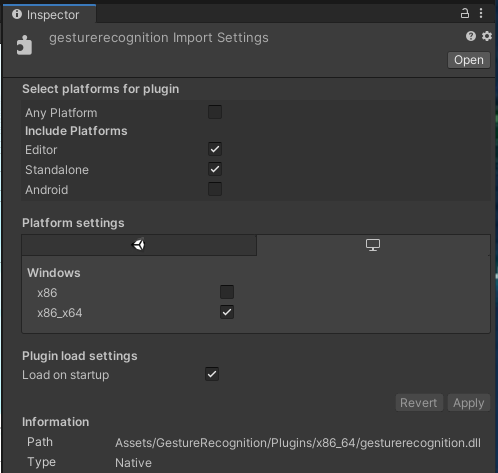
Copy the .dll and .so files from the Plugins/ folder into your own project’s Plugins/ folder. (If your project does not yet have a Plugins/ folder just create a now folder named “Plugins”).
Select the files in Unity and in the inspector ensure that they are selected as plug-ins for the respective architecture:

Plugin library files in the Inspector 

Then copy the Mivry.cs, GestureRecognition.cs and GestureCombinations.cs files into your own project (for example into your Scripts/ folder.

2.3: Add Mivry Gesture Recognition to your scene:

Select a GameObject in your scene (or create a new empty GameObject) and use the “Add Component” button in the Inspector to attach the Mivry component to it.
In the Inspector, set the properties of the Mivry component to comply with your project.

Mivry.cs Properties

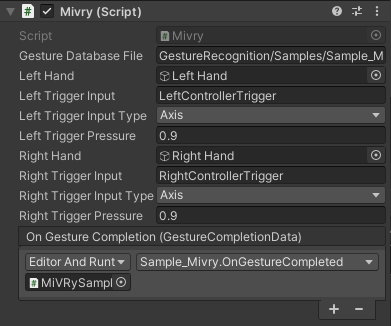
The “Left Hand” and “Right Hand” may be any GameObject that you want to use as the position and rotation of the left and right hand (or VR controller) respectively.
The “Left Trigger Input” and “Right Trigger Input” are the names of the inputs that you wish to use as buttons to control when a gesture should start or end. If you use the old Unity Input system, this must match the name of the input in the Input Manager (in Project settings). If you use the new Unity Input system, this is the name of the InputAction (eg. “{RightHand}/trigger” or “{LeftHand}/grip“) – or you can leave this field empty and instead add a new Input Action to your mapping and set it to OnInputAction_LeftTriggerPress() / OnInputAction_RightTriggerPress() functions of the Mivry.cs component.

Unity Input Manager

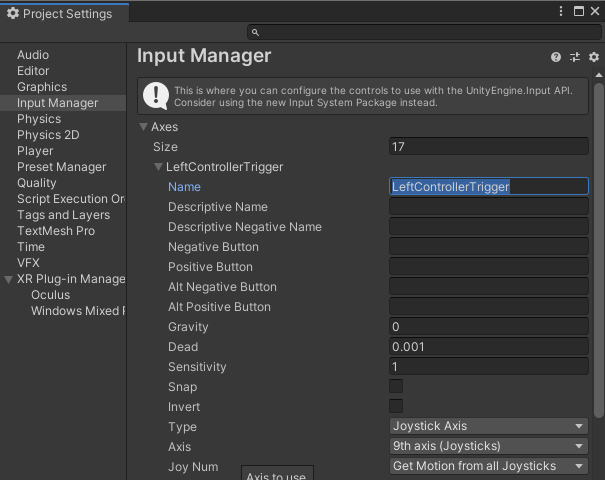
If you do not yet have inputs defined in the Input Manager, please see the Unity documentation on how to set up inputs.

For the “On Gesture Completion” event, add a function to one of your scripts that takes a GestureCompletionData object as parameter.

public void OnGestureCompleted(GestureCompletionData data) {
if (data.gestureID == 123) {
...
}
}

Then set this function as the “On Gesture Completion” event in the Mivry component.
Now when you run your project, press the input button that you selected as gesture trigger and perform a gesture, your OnGestureCompleted function will be called with details about the performed and identified gesture.

Package Overview

(1) Plug-in library files (binaries):

In the Assets/GestureRecognition/Plugins/ folder you can find the plugin library files for various platforms:
– Plugins/x86/gesturerecognition.dll : plug-in library file for 32bit Windows apps
– Plugins/x86_64/gesturerecognition.dll : plug-in library file for 64bit Windows apps
– Plugins/Android/arm64-v8a/libgesturerecognition.so : plug-in library for ARM64 Android apps
– Plugins/Android/armabi-v7a/libgesturerecognition.so : plug-in library for ARM v7 Android apps
– Plugins/Android/UWP/arm_32/gesturerecognition.dll : plug-in library for UWP ARM32 apps
– Plugins/Android/UWP/arm_64/gesturerecognition.dll : plug-in library for UWP ARM64 apps
– Plugins/Android/UWP/x86_32/gesturerecognition.dll : plug-in library for UWP 32bit x86 apps
– Plugins/Android/UWP/x86_64/gesturerecognition.dll : plug-in library for UWP 64bit x86 apps
To use the plug-in in your own project, place these files (or at least the file related to the architecture that you’re developing for) in your Unity project under /Assets/Plugins/ and set the Import Settings in the Inspector to make Unity load the file for the correct platform:

Plugin library files in the Inspector
 

(2) Plug-in wrapper scripts (C#)

MiVRy provides three different script to use the plug-in library. You ever only need one of the three, depending on your requirements and development goals.
– GestureRecognition.cs : C# script for using one-handed one-part gestures.
– GestureCombinations.cs: C# script for using two-handed or multi-part gestures.
– Mivry.cs : Unity component for simple use of pre-recorded gestures without coding.
To use MiVRy in your own project, include these files in your Unity project (for examples under /Assets/ Scripts/).
The GestureRecognition.cs and GestureCombinations.cs scripts are pure C# scripts and not Unity components. They allow you to use MiVRy via C# scripting in your own scripts and give the greatest amount of flexibility. However, they are also more complex to use and require scripting.
The Mivry.cs script is a Unity component script that can just be attached to any GameObject in Unity and allows you to use pre-recorded gestures without the need for scripting. However, it is also more limited.
Here is a simple chart to decide which of the scripts to use in your project:

 GestureRecognition.csGestureCombinations.csMivry.cs
How to use:C# scriptingC# scriptingUnity Inspector
(no scripting required)
Use pre-recorded gesture files:YesYesYes
Record new gestures:YesYesNo
(use GestureManager)

(3) GestureManager:

In the GestureManager/ folder, you will find a Unity Scene that allows easy recording an management of gesture database files (“.dat” files) without any coding or development.
You can also get a pre-built version of the Gesture Manager at https://www.marui-plugin.com/documentation-mivry-unity/#gesturemanager
You can use the GestureManager to record your own gestures.

(4) Samples:

The Samples/ folder offer several Unity scenes and scripts that illustrate the various use cases of MiVRy.
– Sample_MiVRy : Unity sample scene and script on how to use the Mivry component.
– Sample_OneHanded : Unity sample scene and script for one-handed gestures.
– Sample_TwoHanded : Unity sample scene and script for two-handed gestures.
– Sample_Military : Unity sample scene and script for using military tactical gestures.
– Sample_Pixie : Unity sample scene and script of a small game where you interact with a pixie.
– Sample_Continuous : Unity sample scene and script on how to use continuous-motion gestures that do not require a button push to start/end the gesture.
– Sample_Phone : Unity sample scene and script on how to use MiVRy on a mobile phone (android).

IMPORTANT: The samples include several assets (prefabs, textures, …). The MiVRy license does NOT include these assets! They are only included as part of the samples. You may NOT use any of the items in the Resources folder in your project.

Licensing and Activation

MiVRy is free to use for commercial, personal, and academic use.
However, the free version of MiVRy has certain limitations.
The free version of MiVRy can only be used to identify 100 gestures per session (meaning every time you run the app). When using continuous gesture identification, it can only be used for a total of 100 seconds of identifying gestures.

To unlock unlimited gesture recognition, you must purchase a license at:
https://www.marui-plugin.com/mivry/

The license key will be sent to you automatically and immediately after purchase.
If the license email does not arrive, please check your spam filter, and contact support@marui-plugin.com

The license credentials must then be used to activate MiVRy.
If you’re using the MiVRy component, you can just insert the license name and license key in the Unity Inspector of the component.
If you’re using the GestureRecognition.cs or GestureCombinations.cs scripts, you must activate the object by using the activateLicense() function (during runtime).

Using a License File:

Alternatively, you can save the license name (ID) and key into a file and load it with the activateLicenseFile() function (or input insert the path to the license file into the Mivry.cs component / MivryActor if you use either of those).
The license file is a simple text file that you can create with any text editor, that contains the keywords “NAME” and “KEY”, each followed by a colon (“:”) or equal sign (“=”) and then your respective license credentials.

Here is an example of how the contents of a valid license file may look

NAME: your@email.com_3z0UvQ3GBkAc74VW9nQKPlbm
KEY : b701b7235a483698e61a2b8d69479ed013a03069fcb9b892302277a0f394c257

How to use the Gesture Manager

There are two ways to use the GestureManager: in the Unity Inspector and in VR.

Using the GestureManager in the Unity Inspector:

The GestureManager.cs script can be attached as a component to any Unity GameObject. In the GestureManager scene, it is attached to the GameObject called “GestureManager”. You do not need to run the scene in order to use the GestureManager in the Inspector. Simply select the GestureManager GameObject (the Unity game object which has the GestureManager.cs script attached to it) and adjust the properties in the Inspector. However, in order to record new gestures, you obviously need to run the scene. Please note that starting/stopping will reset what you entered in the Inspector.

Using the GestureManager in VR:

When you run the GestureManager scene (either inside the Unity Editor or stand-alone on any device, a floating panel will appear.
You can move the panel by touching the red ball on it’s top. The ball is ‘sticky’, allowing you to move the panel. To stop dragging the panel, just pull your controller away with a sudden “yanking” motion.
A video tutorial on how to use the GestureManager in VR is available on YouTube:
https://www.youtube.com/watch?v=xyqeacqpES8

Important input fields in the GestureManager (both Inspector and VR versions):

Number of Parts: How many motions – at most – comprise a gesture. A gesture consisting of one single hand motion has one part. A two-handed gesture has two parts, one for the left hand and one for the right hand. It is also possible to use gesture combinations where one hand has to perform multiple sequential motions (such as writing three letters – the individual letters are parts to a combination triplet). The number you put in this field decides the maximum. You can still also have combinations with less parts (for example: one-handed gestures among two-handed gestures).

Rotational Frame of Reference: How direction like “up”, “down”, “left”, “right”, “forward” and “back” are defined. For example, if a player is looking at the ceiling and performs a gesture in front of his face, in the “world” frame-of-reference, the gesture was performed “upward” because it was performed above the player’s head. But in the “head” frame-of-reference, the gesture was performed “forward”. This can decide which gesture is identified. For example, if you have a “punch the ceiling” gesture and a “punch the ground” gesture, you must choose a “world” frame-of-reference, but if you have a “touch my forehead” gesture and a “touch my chin” gesture, a “head” frame-of-reference may be more appropriate. The frame of reference can be selected separately for yaw (left-right / north-south), pitch (up/down) and roll (tiling the head).

Record Gesture Samples: This selects I for which gesture you want to record new samples or if you want to test the identification instead (please note that new samples do not have any effect until the “training” was performed). When you record samples, please make sure that you record the gesture many different ways. For example, if the player should be allowed to perform the gesture with a small motion and a large motion, be sure to record both small and large samples. It can also help to record gesture samples from several people to ensure that particular habits of one person don’t affect the recognition for other players.
Start Training / Stop Training: This starts or interrupts the training process where the AI tries to learn your gestures. The “Performance” value which is updated during the training indicates how many of your gestures the AI can already correctly identify. Even when the training the training is stopped prematurely the result is still preserved, so you can stop it as soon as you are satisfied. Sometimes the AI ‘misunderstands’ your intensions and the future recognition of gestures is not satisfactory. In this case, just re-run the training process. If the result still is not good, please record more gesture samples with greater variation to make it clearer to the AI what you intend.

How to use the Mivry.cs script (Unity GameObject Component Script)

(1) Add the Mivry.cs script as a component to one (any) object in your scene.

(2) In one of your own scripts, add a new function to handle the event when a gesture is performed and recognized. The function should have a parameter of the type GestureCompletionData and return type void.
Example:

public void OnGestureCompleted(GestureCompletionData data) {
if (data.gestureID == 123) {
...
}
}

(3) In the inspector, set the fields of the MiVRy script component:
– “GestureDatabaseFile“:
The path to the gesture recognition database file to load.
In the editor, this will be relative to the Assets/ folder.
In stand-alone (build), this will be relative to the StreamingAssets/ folder.
– “LeftHand” / “RightHand“:
A game object that will be used as the position of the left hand.
– “LeftTriggerInput” / “RightTriggerInput“:
The name of the input which will be used to start/end the gesture. If you use the old Unity Input system, this must match the name of the input in the Input Manager (in Project settings). If you use the new Unity Input system, this is the name of the InputAction (eg. “{RightHand}/trigger” or “{LeftHand}/grip“) – or you can leave this field empty and instead add a new Input Action to your mapping and set it to OnInputAction_LeftTriggerPress() / OnInputAction_RightTriggerPress() functions of the Mivry.cs component.
– “LeftTriggerInputType” / “RightTriggerInputType“:
The type of the input (Axis, Button, or Key) which triggers the gesture.
– “LeftTriggerPressure” / “RightTriggerPressure“:
If the input type is axis, how strongly (on a scale from zero to one) does the axis have to be pressed to trigger the start of the gesture.
– “OnGestureCompletion“:
Event callback functions to be called when a gesture was performed.
When these properties are set, the Mivry script will detect the push of the button defined as “trigger”, track the position of the GameObject defined as “Hand” and, upon release of the “trigger” button will automatically identify the gesture and call the OnGestureCompletion function with details about the detected gesture.


How to use the GestureRecognition.cs script (for one-handed gestures)

(1) Place the Plugins/x86_64/gesturerecognition.dll (Windows) and/or Plugins/Android/arm64-v8a/libgesturerecognition.so (Android / MobileVR / Oculus Quest) files in the /Assets/Plugins/ folder in your unity project and add the GestureRecognition.cs file to your project scripts.

(2) Create a new Gesture recognition object and register the gestures that you want to identify later.

GestureRecognition gr = new GestureRecognition();
int myFirstGesture = gr.createGesture("my first gesture");
int mySecondGesture = gr.createGesture("my second gesture");

(3) Record a number of samples for each gesture by calling startStroke(), contdStroke() and endStroke() for your registered gestures, each time inputting the headset and controller transformation.

Vector3 hmd_p = Camera.main.gameObject.transform.position;
Quaternion hmd_q = Camera.main.gameObject.transform.rotation;
gr.startStroke(hmd_p, hmd_q, myFirstGesture);
[…]
// repeat the following while performing the gesture with your controller:
Vector3 p = OVRInput.GetLocalControllerPosition(OVRInput.Controller.RTouch);
Quaternion q = OVRInput.GetLocalControllerRotation(OVRInput.Controller.RTouch);
gr.contdStrokeQ(p,q);
// ^ repead while performing the gesture with your controller.
[…]
gr.endStroke();

Repeat this multiple times for each gesture you want to identify.
We recommend recording at least 20 samples for each gesture.

(4) Start the training process by calling startTraining().
You can optionally register callback functions to receive updates on the learning progress by calling setTrainingUpdateCallback() and setTrainingFinishCallback().

gr.setMaxTrainingTime(10); // Set training time to 10 seconds.
gr.startTraining();

You can stop the training process by calling stopTraining().
After training, you can check the gesture identification performance by calling recognitionScore() (a value of 1 means 100% correct recognition).

(5) Now you can identify new gestures performed by the user in the same way as you were recording samples:

Vector3 hmd_p = Camera.main.gameObject.transform.position;
Quaternion hmd_q = Camera.main.gameObject.transform.rotation;
gr.startStroke(hmd_p, hmd_q);
[…]
// repeat the following while performing the gesture with your controller:
Vector3 p = OVRInput.GetLocalControllerPosition(OVRInput.Controller.RTouch);
Quaternion q = OVRInput.GetLocalControllerRotation(OVRInput.Controller.RTouch);
gr.contdStrokeQ(p,q);
// ^ repeat while performing the gesture with your controller.
[…]
int identifiedGesture = gr.endStroke();
if (identifiedGesture == myFirstGesture) {
// ...
}

(7) More than just getting the most likely candidate which gesture was performed, you can also get the similarity how much the performed motion resembles the identified gesture:
double similarity;

int identifiedGesture = gr.endStroke(similarity);

This returns a value between 0 and 1, where 0 indicates that the performed gesture is very much unlike the previously recorded gestures, and 1 indicates that performed gesture is the exact average of all previously recorded gestures and thus highly similar to the intended gesture.

(6) You can save and load your gestures to a gesture database file.

gr.saveToFile("C:/myGestures.dat");
// ...
gr.loadFromFile("C:/myGestures.dat");

How to use the GestureCombinations.cs script (for two-handed gestures and gesture-combos)

(1) Place the Plugins/x86_64/gesturerecognition.dll (Windows) and/or Plugins/Android/libgesturerecognition.so (Android / MobileVR / Oculus Quest) files in the /Assets/Plugins/ folder in your unity project and add the GestureCombinations.cs file to your project scripts.

(2) Create a new Gesture recognition object and register the gestures that you want to identify later. (In this example, we use gesture part “0” to mean “left hand” and gesture part “1” to mean right hand, but it could also be two sequential gesture parts performed with the same hand.)

GestureCombinations gc = new GestureCombinations(2);
int myFirstCombo = gc.createGestureCombination("wave your hands");
int mySecondCombo = gc.createGesture("play air-guitar");

Also, create the individual gestures that each combo will consist.

int myFirstCombo_leftHandGesture = gc.createGesture(0, "Wave left hand");
int myFirstCombo_rightHandGesture = gc.createGesture(1, "Wave right hand");
int mySecondCombo_leftHandGesture = gc.createGesture(0, "Hold guitar neck");
int mySecondCombo_rightHandGesture = gc.createGesture(1, "Hit strings");

Then set the Gesture Combinations to be the connection of those gestures.

gc.setCombinationPartGesture(myFirstCombo, 0, myFirstCombo_leftHandGesture);
gc.setCombinationPartGesture(myFirstCombo, 1, myFirstCombo_rightHandGesture);
gc.setCombinationPartGesture(mySecondCombo, 0, mySecondCombo_leftHandGesture);
gc.setCombinationPartGesture(mySecondCombo, 1, mySecondCombo_rightHandGesture);

(3) Record a number of samples for each gesture by calling startStroke(), contdStroke() and endStroke() for your registered gestures, each time inputting the headset and controller transformation.

Vector3 hmd_p = Camera.main.gameObject.transform.position;
Quaternion hmd_q = Camera.main.gameObject.transform.rotation;
gc.startStroke(0, hmd_p, hmd_q, myFirstCombo_leftHandGesture);
gc.startStroke(1, hmd_p, hmd_q, myFirstCombo_rightHandGesture);
[…]
// repeat the following while performing the gesture with your controller:
Vector3 p_left = OVRInput.GetLocalControllerPosition(OVRInput.Controller.LTouch);
Quaternion q_left = OVRInput.GetLocalControllerRotation(OVRInput.Controller.LTouch);
gc.contdStrokeQ(0, p_left, q_left);
Vector3 p_right = OVRInput.GetLocalControllerPosition(OVRInput.Controller.RTouch);
Quaternion q_right = OVRInput.GetLocalControllerRotation(OVRInput.Controller.RTouch);
gc.contdStrokeQ(0, p_right, q_right);
// ^ repead while performing the gesture with your controller.
[…]
gc.endStroke(0);
gc.endStroke(1);

Repeat this multiple times for each gesture you want to identify.
We recommend recording at least 20 samples for each gesture, and have different people perform each gesture.

(4) Start the training process by calling startTraining().
You can optionally register callback functions to receive updates on the learning progress by calling setTrainingUpdateCallback() and setTrainingFinishCallback().

gc.setMaxTrainingTime(60); // Set training time to 60 seconds.
gc.startTraining();

You can stop the training process by calling stopTraining(). After training, you can check the gesture identification performance by calling recognitionScore() (a value of 1 means 100% correct recognition).

(5) Now you can identify new gestures performed by the user in the same way as you were recording samples:

Vector3 hmd_p = Camera.main.gameObject.transform.position;
Quaternion hmd_q = Camera.main.gameObject.transform.rotation;
gc.startStroke(0, hmd_p, hmd_q);
gc.startStroke(1, hmd_p, hmd_q);
[…]
// repeat the following while performing the gesture with your controller:
Vector3 p_left = OVRInput.GetLocalControllerPosition(OVRInput.Controller.LTouch);
Quaternion q_left = OVRInput.GetLocalControllerRotation(OVRInput.Controller.LTouch);
gc.contdStrokeQ(0, p_left, q_left);
Vector3 p_right = OVRInput.GetLocalControllerPosition(OVRInput.Controller.RTouch);
Quaternion q_right = OVRInput.GetLocalControllerRotation(OVRInput.Controller.RTouch);
gc.contdStrokeQ(1, p_right, q_right);
// ^ repead while performing the gesture with your controller.
[…]
gc.endStroke(0);
gc.endStroke(1);
int identifiedGestureCombo = gc.identifyGestureCombination();
if (identifiedGestureCombo == myFirstCombo) {
// ...
}

(6) Now you can save and load the artificial intelligence.

gc.saveToFile("C:/myGestureCombos.dat");
// ...
gc.loadFromFile("C:/myGestureCombos.dat");

How to use MiVRy.cs in Bolt StateGraphs

(1) Make sure both Bolt and MiVRy are installed in your project.
Open the Mivry.cs file in the Assets/GestureRecognition/ folder and un-comment the following line by removing the “//” at the beginning of the line.
//#define MIVRY_USE_BOLT
to
#define MIVRY_USE_BOLT

(2) In Unity, open the Bolt Unit Options Wizard (in the title bar menu Tools -> Bolt -> Unit Options Wizard, if the menu does not exist, check if Bolt was installed properly in your project).
In the Wizard, click “Next” to get to the “Type Options” page.
At the bottom of the list, click the “+” icon twice to add two more entries.
For the two entries select “Mivry” (C# script) and “Gesture Completion Data” (object).
Then, click “Generate“.
Bolt Unit Options Wizard for MiVRy

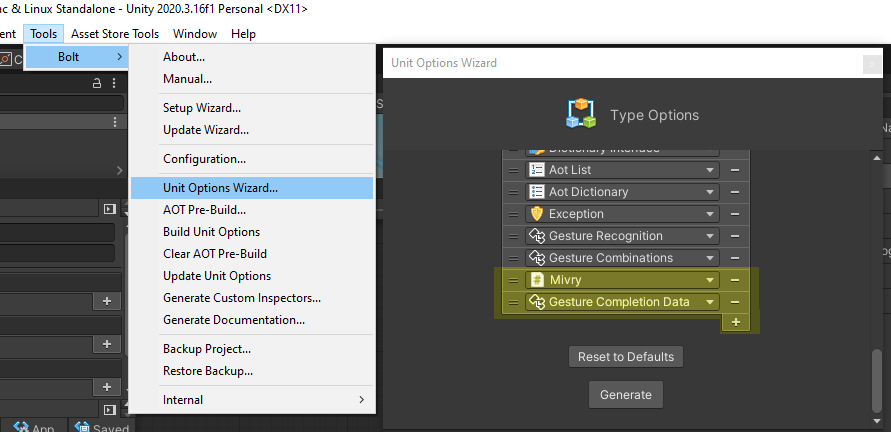
(3) Add the “Mivry” script component to any game object in your scene. (For example, you can right-click in the Hierachry and select “Create Empty”, select the new object, and in the Inspector click on “Add Component” and choose “MiVRy”.
In the inspector, fill in the values of the Mivry script components, especially “Gesture Database File”, “Left Hand”, “Left Hand Trigger Input”, “Right Hand” and “Right Hand Trigger Input.
Alternatively, you could also create a scene variable or graph variable, but then you have to set the member variables (such as “Gesture Database File”) in a Flow Graph instead of just using the Inspector.

(4) Open your Bolt state machine / state graph. (If you do not yet have a state graph, you can create one on the same game object by clicking “Add Component” in the Inspector and selecting “State Machine”. On the new state machine component click “Edit Graph”).

(5) Make sure there are at least two states, of which one must be the “Start” state, and the states are connected by a transition.
If you do not have any states yet, right-click in the graph window, and select “New Flow State”. You can toggle one of the states to be the start state by right-clicking it and selecting “Toggle Start”. You can create a transition between two states by right-clicking the first state, and selecting “make transition”, and then clicking on the second state.
Then double-click on the transition to open the transition graph.
Bolt State Graph sample

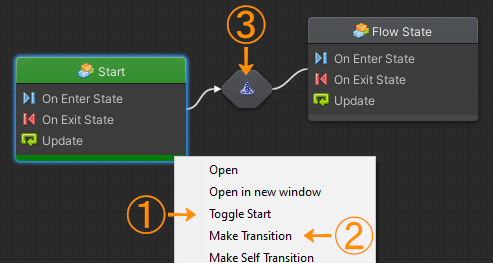
(6) In the Variables “Blackboard” switch to the “Scene” tab and create a new variable by typing in a Name in the “(New Variable Name)” field and pressing the “+” icon.
If you cannot see the Blackboard, you can open it from the title bar menu “Window” -> “Variables”.
As “Variable Type” select “Mivry”, and as “Value” select the object to which you attached the Mivry script component in step (3).
Unity Bolt Blackboard MiVRy variable

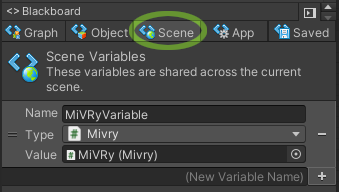
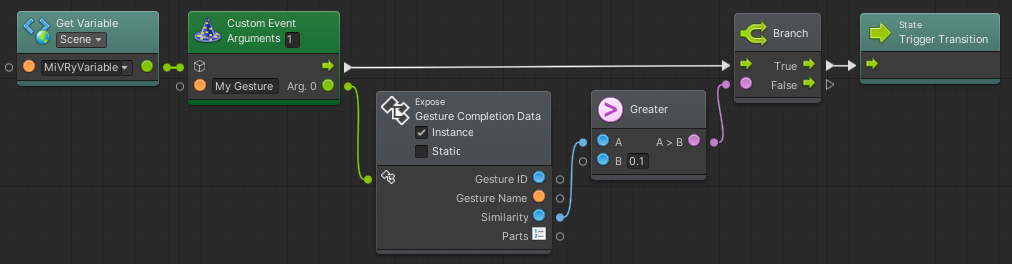
(7) In the Transition State Graph, add a “Get Scene Variable” node (by right-clicking in the graph and selecting “Get Scene Variable”), and set it to the Mivry Variable created in step (6).
Then create a “Custom Event” node (right-click in the graph and select “Custom Event”), and connect the Get Variable node as it’s input object.
Change the number of “Arguments” to “1”,
and change the Event String to the name of the gesture that you want to trigger the transition.
Optionally, you can expose the argument “Arg. 0” as “Gesture Completion Data”, for example to check the similarity of the gesture performance before triggering the transition. (When you expose the object, be sure to select “Instance” and not “Static”).
Unity Bolt State Transition Graph

Build Instructions for Windows

(1) Make sure plug-in file (Plugins/x86_64/gesturerecognition.dll) is in the “Plugins” folder of your project

(2) In your Unity editor, select the plug-in file and in the inspector make sure it is selected as a plug-in file for the Windows platform.

(3) Place your gesture database (“.DAT”) files in a folder called “StreamingAssets” in your Unity project.

(4) In your Unity script file, use Application.streamingAssetsPath as base folder when loading the gesture library instead of an absolute file path. You can use the UNITY_EDITOR preprocessor variable to make sure your game will find the gesture recognition database file both when playing in the Unity editor and when building / exporting as a stand-alone game:

#if UNITY_EDITOR
gr.loadFromFile("myProject/myGestureDatabaseFile.dat");
#else
gr.loadFromFile(Application.streamingAssetsPath + "/myGestureDatabaseFile.dat");
#endif

Build Instructions for Android (Mobile VR, Oculus Quest, …)

(1) Make sure plug-in files (Plugins/Android/arm64-v8a/libgesturerecognition.so and Plugins/Android/armeabi-v7a/libgesturerecognition.so) are in the “Plugins” folder of your project.

(2) In your Unity editor, select the plug-in files and in the inspector make sure it is selected as a plug-in file for the Android platform for ARM64 and ARMv7 respectively.

(3) Place your gesture database (“.DAT”) files in a folder called “StreamingAssets” in your Unity project.

(4) In your Unity script file, use Unity’s Android Java API to get the location of the cache folder and use a UnityWebRequest to extract the gesture database file from the .apk to the cache folder and load it from there. This is necessary, because on Android all project files are packed inside the .apk file and cannot be accessed directly. You can use the UNITY_ANDROID preprocessor variable to make sure your game will find the gesture recognition database file both when playing in the Unity editor and when building / exporting as a stand-alone Android app:

LoadGesturesFile = "myGestures.dat";
// Find the location for the gesture database (.dat) file
#if UNITY_EDITOR
// When running the scene inside the Unity editor,
// we can just load the file from the Assets/ folder:
string gesture_file_path = "Assets/GestureRecognition";
#elif UNITY_ANDROID
// On android, the file is in the .apk,
// so we need to first "download" it to the apps' cache folder.
AndroidJavaClass unityPlayer = new AndroidJavaClass("com.unity3d.player.UnityPlayer");
AndroidJavaObject activity = unityPlayer.GetStatic<AndroidJavaObject>("currentActivity");
string gesture_file_path = activity.Call
<AndroidJavaObject>("getCacheDir").Call<string>("getCanonicalPath");
UnityWebRequest request = UnityWebRequest.Get(Application.streamingAssetsPath
+ "/" + LoadGesturesFile);
request.SendWebRequest();
while (!request.isDone) {
// wait for file extraction to finish
}
if (request.isNetworkError) {
// Failed to extract sample gesture database file from apk
return;
}
File.WriteAllBytes(gesture_file_path + "/" + LoadGesturesFile, request.downloadHandler.data);
#else
// This will be the case when exporting a stand-alone PC app.
// In this case, we can load the gesture database file from the streamingAssets folder.
string gesture_file_path = Application.streamingAssetsPath;
#endif
if (gr.loadFromFile(gesture_file_path + "/" + LoadGesturesFile) != 0) {
// Failed to load sample gesture database file
return;
}

(5) In your project settings, make sure that your settings comply with the Oculus Quest requirements and best practices described at https://developer.oculus.com/documentation/unity/unity-conf-settings/

(6) If you are building for the Quest 2, make sure to set the Color Space in the project settings android section to “Gamma”.

Troubleshooting and Frequently Asked Questions

(1) Where in my own program do I have to create the GestureRecognition or GestureCombination object?

You can create the gesture recognition object anywhere in your project. There are no special requirements where to do it. Commonly, it is created in the XR rig or Oculus/HTC Vive VR framework where the controller input is processed, but this is just one option.

(2) How can I get the position of VR controllers (Oculus Touch, HTC Vive Controllers, Valve Knuckles controller etc)?

As you can see in the Sample_OneHanded.unity scene, you can use the generic Unity XR rig with two objects “Left Hand” and “Right Hand” which are set to be Generic XR Controllers. So they work for any supported VR device.
Then, in the C# script you can just use

GameObject left_hand = GameObject.Find("Left Hand");
gc.contdStroke(Side_Left, left_hand.transform.position, left_hand.transform.rotation);

or

GameObject right_hand = GameObject.Find("Right Hand");
gc.contdStroke(Side_Right, right_hand.transform.position, right_hand.transform.rotation);

If in your project you cannot use the XR rig, please check out the Unity documentation for which commands will relate to your device:
https://docs.unity3d.com/Manual/OpenVRControllers.html

(3) How can I save my own recorded gestures to use them the next time I start Unity?

In your own script, you can save your recorded gestures with
gr.saveToFile(“C:/where/you/want/your/myGestureCombos.dat”);
This file you can then load next time you start the program.
If you used the GestureRecognitionSample_OneHanded Unity file, then your gestures will be saved in your asset folder in
GestureRecognition\Sample_TwoHanded_MyRecordedGestures.dat
Please see the GestureRecognitionSample_OneHanded.cs script on line 429 to see how it works.

(4) How can I open and edit gesture database (.DAT) files?

Please use the “GestureManager” scene in the Unity sample to open and edit.DAT gesture database files.

(5) The Gesture Recognition library does not detect if a gesture is different from all recorded gestures. I want to know if the user makes the gesture I recorded or not.

The gesture recognition plug-in will always return the number of which other (known) gesture is most similar to the one you just performed.
If you want to check if the gesture you made is different from all the recorded gestures, use the following code instead of the normal “endStroke()” function:

double similarity;
int identified_gesture = endStroke(ref similarity);

Then the similarity variable will give you a measurement of how similar the performed gesture was to the detected gesture. A value of one will indicate perfect similarity, a low value close to zero indicate great differences between the performed gesture and the recorded gesture. You can use this value to judge if the performed gesture is sufficiently similar to the recorded one.

(6) I want to use Gesture Recognition in my commercial project. What commercial licensing options do you provide?

We offer both single-payment licenses for one project or profit-sharing licenses where we receive a part of the sales price on each unit sold.
Pricing is dependent on the size of your project.
Please contact us at support@marui-plugin.com for details.

(7) Do I have to call “startTraining()” every time I start my game? Does it have to keep running in the background while my app is running?

No, you only need to call startTraining() after you have recorded new gesture data (samples) and want these new recordings to be used by the AI. However, you need to save the AI after training to a database file (.DAT) and load this file in your game before using the other gesture recognition functions.
While the training is running, you cannot use any of the other functions, so you cannot let training run in the background. You must start (and stop) training in between using the AI.

(8) How long should I let the training run to achieve optimal recognition performance?

Usually, the AI will reach its peak performance within one minute of training, but if you’re using a large number of gestures and samples, it may take longer. You can check the current recognition performance from the training callback functions and see if the performance still keeps increasing. If not, feel free to stop the training.

(9) Gestures aren’t recognized correctly when I look up/down/left/right or tilt my head.

You can choose if the frame of reference for your gestures are the players point of view (“head”) or the real world or game world (“world”). For example, if the player is looking up to the sky when performing a gesture towards the sky, then from a “world” frame-of-reference the direction is “up”, but from players “head” point-of-view, the direction is “forward”. Therefore, if you consider your gestures to be relative to the world “up” (sky) and “down” (ground) rather than the visual “upper end of the screen” and “lower end of the screen”, then change the frameOfReferenceUpDownPitch to FrameOfReference.World. The same setting is available for the yaw (compass direction) and head tilt.

(10) What is the “Unity Input Path” for a specific button?

The path usually consists of the name of the device (“<XRController>”, “<ViveWand>”, “<ValveIndexController>”, “<OculusTouchController>”, “<OpenVROculusTouchController>”, “<WMRSpatialController>”, “<ViveController>”, “<HololensHand>”, “<WMRHMD”, “<OculusHMD>”, “<Keyboard>”, etc), optionally followed by “{LeftHand}” or “{RightHand}” if you wish to specify the side, followed by a dash (“/”) character, followed by the name of the button or event (“gripPressed”, “menu”, “triggerPressed”, “joystickClicked”, “touchpadClicked”, “touchpadTouched”, “airTap”, “primaryButton”, “primaryTouched”, “secondaryButton”, “secondaryTouched”, “triggerTouched”, “thumbstickClicked”, “thumbstickTouched”, “back”, “volumeUp”, “volumeDown”, “app”, “home”, “touchpadClick”, “touchpadTouch”, “primary”, “trackpadPressed”, “trackpadTouched”, “select”, “trackpadClicked”, “system”, “systemTouched”).
Here are a few examples:
– “<XRController>{RightHand}/triggerPressed”
– “<ValveIndexController>/system”
– “<HololensHand>/airTap”
– “<OculusHMD>/userPresence”
– “<Keyboard>/escape”
If you wish to use a specific button that is not listed above, you can find out what it’s “path” is in the following way:
Create a new Input Action Asset (right-click in the Project explorer -> create -> input action) or use one you already have. Open it and add the Action and Binding that you want to use. Save the Input Action Asset. In the Project explorer, right-click on the Input Action Asset and select “Show in Explorer”. Open the “.inputactions” file in a text editor and look for the “path” entry of your Binding.

(11) MiVRy identifies any motion as some gesture, even when it doesn’t resemble any of the recorded gestures. Why? How can I tell if no valid gesture motion was performed?

MiVRy will always tell you the “most likely” best guess as to which gesture was just performed, no matter how different the currently performed motion is from all recorded gestures. This is because we cannot decide for you how much difference is tolerable.
In order to disqualify “wrong” motions, you have two options:
(A) you can check the “similarity” value returned by MiVRy. This value describes how similar the gesture motion was compared to previous recordings on a scale from 0 (very different) to 1 (very similar).
(B) you can check the “probability” value. Especially when you compare the probability values for all recorded gestures (for example via the “endStrokeAndGetAllProbabilitiesAndSimilarities” function) and see that they are all very low and not very different from one another, you may want to decide that the current gesture performance was not valid.

(12) What exactly does die “similarity” value of a gesture performance mean? How is it different from the probability value?

The “similarity” value expresses how much the identified gesture differs from the average of the recorded samples for that gesture. When you record several samples, MiVRy internally calculates a “mean” (“average”, “typical”) gesture motion based on those samples. It also calculates how much the recorded samples differ from this “mean” (ie. the “variance” of the samples). The “similarity” value is then calculated based on this “mean”. If your newly performed gesture motion hits exactly this “average”, then the similarity value will be one. The more it differs, the lower the “similarity” value will be, going towards zero. How fast it will fall depends on how similar the recorded samples were. If all recorded samples looked exactly the same, then MiVRy will be very strict, and the “similarity” value will fall fast when the currently performed motion isn’t also exactly alike. If, however the samples differed a lot, MiVRy will be more tolerant when calculating the “similarity” value and it will be higher. The value is always between 0 and 1. This “similarity” is different from the “probability” values, which are estimates by the artificial intelligence (neural network). “Probability” may contain many more considerations, for example if there are other gestures who resemble the identified gesture (probability may drop, similarity is unaffected), or if there are a multitude of distinct motions lumped together as one “gesture” (for example: having a gesture “alphabet” which contains drawings of “A”, “B”, “C” etc all lumped together as one gesture – then “similarity” will be calculated based on an “average” character that doesn’t resemble any sample, but the AI may successfully understand what you mean and give high “probability” values).

(13) Instead of triggering the start and end of a gesture motion, I want MiVRy to constantly run in the background and detect gestures as they occur.

You can use the “Continuous Gesture Identification” feature of MiVRy. When using the “GestureRecognition” or “GestureCombinations” objects directly, use the “contdIdentify” function – you can call this function repeatedly (for example on every frame or when something in your app happens) and every time it will tell you which gesture is currently being performed. When using the Unity “Mivry” component or the UnrealEngine “MivryActor”, use the “Continuous Gesture Identification” switch. Either way, two settings are important for Continuous Gesture Identification: “Continuous Gesture Period” and “Continuous Gesture Smoothing”. “Continuous Gesture Period” is the time frame (in milliseconds) that continuous gestures are expected to be. So if your gestures take 1 second to perform, set this to “1000” so that MiVRy will consider the last 1000 milliseconds to identify the gesture. “Continuous Gesture Smoothing” is the number of samples (previous calls to “contdIdentify” to use for smoothing continuous gesture identification results). When setting this to zero, each attempt to identify the gesture will stand alone, which may lead to sudden changes when switching from one gesture to another. If ContinuousGestureSmoothing is higher than zero, MiVRy will remember previous attempts to identify the gesture and will produce more stable output.

(14) What is the “Update Head Position Policy” / “Compensate Head Motion” setting?

This setting decides whether the AI should consider changes in head position during the gesturing.
During gesturing, the current position of the VR headset can/will be updated via the “updateHeadPosition” procedure.
This data is saved together with the motion data.
However, in many cases it is not advisable to take head motions during gesturing into account, because people may watch their hands while gesturing.
Following the moving hands with the head would then eliminate the hand motion relative to the headset (the hands would always be “in front of the headset”).
However, in some cases it may be useful to use the changing head position, for example if the user might be walking during a gesture.
You can chose whether or not the the data provided via calls to “updateHeadPosition” functions will be used with the UpdateHeadPositionPolicy (or call to GestureRecognition.setUpdateHeadPositionPolicy().
“UseLatest” will cause MiVRy to use the changing head position, thus compensating the relative head motion during gesturing.
“UseInitial” will not consider changes in head motion during gesturing, but only the head position at the start of the gesture.
Note that if you use a GestureRecognition or GestureCombinations object directly, you also need to provide the changing head position via “updateHeadPosition()” for this to have any effect.
Also note that the data provided via “updateHeadPosition” is stored regardless of the policy, even when it is not used later.